Hexagonal Architecture in Web Development: A Deep Dive with Code Snippets

Maintaining a clean, scalable, and robust architecture has always been a cornerstone of successful web development projects. However, achieving this level of architectural sanctity isn't always straightforward, especially as projects scale. That's where Hexagonal Architecture comes in. This blog post aims to provide a comprehensive guide to implementing Clean Architecture in your web development projects, complete with code snippet examples. approach—a method that can elevate your web development game to new heights. In this blog post, we'll delve into this fascinating strategy that focuses on writing the core logic as pure classes, followed by HTTP wrappers for deployment to a web server.
If you've ever stumbled upon spaghetti code that intertwines business logic with database queries and HTTP request handling, you know the struggle. The lack of structure can turn even the simplest codebase into a labyrinth that's difficult to understand, maintain, and test. Enter the "Hexagonal Architecture"
What Exactly is Hexagonal Architecture?
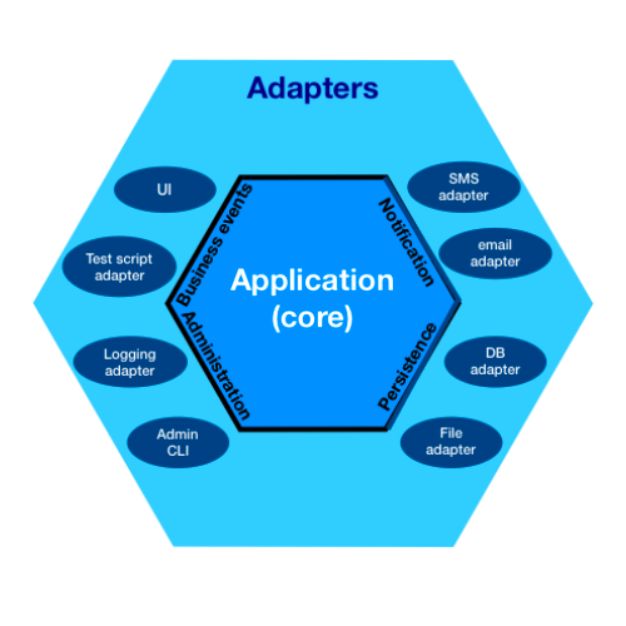
Hexagonal Architecture advocates for a separation between the core logic of your application and the external elements. This means you build your core business logic as pure classes and then create HTTP wrappers (or controllers) to interact with the web server.
The Advantages
1. Separation of Concerns
Your core logic stays uncoupled from the web server and database, making the code easier to manage.
2. Testability
Pure classes allow for easy unit testing since they are self-contained.
3. Reusability and Portability
The core logic can be reused across different platforms or projects.
4. Flexibility
Switching between web frameworks or databases becomes a lot easier.
The Roadmap to Hexagonal Architecture
Let's go through a step-by-step guide to implementing Hexagonal Architecture, using a simple User Management System as an example.
Step 1: Identify Core Logic
The first step is to identify the core functionalities your system should have. For our User Management System, this would be:
- Creating a user
- Deleting a user
- Updating user information
Step 2: Design Domain Models
Create classes that encapsulate your core logic. These classes should be 'pure,' meaning they should not rely on external systems or produce side effects.
Here's a Python example of what a simple User class might look like:
class User:
    def __init__(self, id, name, email):
        self.id = id
        self.name = name
        self.email = email

    def update_name(self, new_name):
        self.name = new_name

    def update_email(self, new_email):
        self.email = new_email

# Usage
user1 = User(1, "Alice", "alice@email.com")
user1.update_name("Alicia")
Step 3: Unit Testing
Unit tests ensure that your core logic is solid. Here's how you could test the User class:
import unittest

class TestUser(unittest.TestCase):
    def test_update_name(self):
        user = User(1, "Alice", "alice@email.com")
        user.update_name("Alicia")
        self.assertEqual(user.name, "Alicia")

    def test_update_email(self):
        user = User(1, "Alice", "alice@email.com")
        user.update_email("alicia@email.com")
        self.assertEqual(user.email, "alicia@email.com")

if __name__ == '__main__':
    unittest.main()

Step 4: Create HTTP Wrappers
After your core logic is tested and stable, you can build HTTP wrappers. In a Python Flask app, this could look something like:
from flask import Flask, request, jsonify
app = Flask(__name__)

@app.route('/users', methods=['POST'])
def create_user():
    id = request.json['id']
    name = request.json['name']
    email = request.json['email']
    user = User(id, name, email)
    # ... (Save the user to the database)
    return jsonify({"message": "User created"}), 201

# Continue with routes for updating and deleting users
Step 5: Integration Testing
Integration tests ensure that your HTTP wrappers and core logic work well together.
# Using Python's unittest for integration testing
class TestUserRoutes(unittest.TestCase):
    def test_create_user(self):
        # Simulate a POST request to /users and check response
        # ...

    def test_update_user(self):
        # Simulate a PUT request to /users/1 and check response
        # ...
Step 6: Deployment
Once all tests pass and you've reviewed your code, you're ready for deployment.
Conclusion
Hexagonal Architecture may seem like an investment in time initially, but the long-term benefits far outweigh the initial setup time. Your code will be cleaner, more maintainable, and much easier to test. Plus, future changes or additions to the project will be much simpler to implement.
So, the next time you kick off a web development project, consider giving Hexagonal Architecture a try. It might just be the best decision you make for your codebase, your team, and ultimately, your users.
Happy coding! 🚀